hello friends! new(ish)!
MPC-HC

Media Player Classic - Home Cinema (MPC-HC) is an advanced, lightweight, modular and open source media player supporting most known video and audio formats. It features:
- Almost all video and audio formats (including high10, HEVC and VP9) support.
- Customizable keyboard shortcuts while still having a handy GUI.
- Customizable video and audio renderer.
- Ordered chapters support.
More at mpc-hc.org. Download latest here (you should take the x86 one because MadVR and xy-SubFilter are only compatible with it).
Configuration guide
Downloads
This guide will include the use of:
- madVR - An advanced video renderer relying on the GPU and sporting a lot of features including OpenCL (now use DirectCompute instead) error diffusion dithering, OpenCL NNEDI3 image doubling, high quality luma/chroma scaling algorithms, anti-ringing filter, debanding filter, Smooth Motion interpolation algorithm and customizable keyboard shortcuts. - Download latest here.
- xy-SubFilter - The only known Windows subtitle renderer matching libass performances - Download latest here.
- ReClock - Provide reclocking support (syncing between audio and video). Made by Slysoft, a developer known for his AnyDVD DVD/BD ripping software - Download latest here.
The fact that the famous LAVfilters are now bundled with MPC-HC deserves to be mentioned.

Setup
- Install MPC-HC by running the .exe and following the instructions.
- Extract madVR.zip to a safe place (C:\Program Files(x86)\madVR for example) and run the install.bat as admin.
- Install xy-SubFilter by running the .exe.
- Install ReClock by running the .exe.
- Now open MPC-HC and open the option window by pressing O. Go to "Playback" and disable "Auto-load subtitles".
- Then, go to "Output", select madVR as "DirectShow Video" and ReClock as "Audio Renderer".
You successfully installed MPC-HC and the needed components. Now, try to play a video file, these icons should show up in the tray.
MadVR configuration

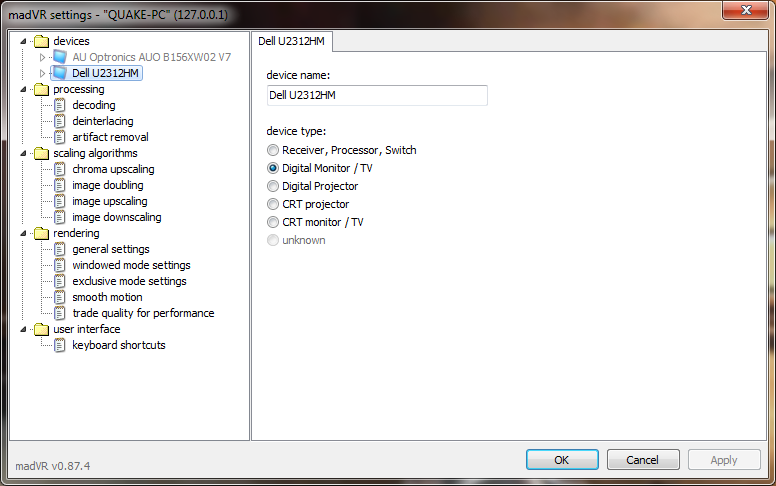
You can edit MadVR's settings by clicking on the tray icon, or by running madHcCtrl.exe.
- First, go under processing->deinterlacing and disable "only look at pixels in the frame center" (because /g/ likes animu). You can activate the debanding filter by going then under processing->artifact removal.
- Now, the scaling algorithm tab. I'll split this in three tiers, according to the strength of your GPU (bottom being something like HD3000, mid 640M/7730M and high 770/7970)
- Chroma upscaling=Softcubic(0.70)+AR (anti-ringing filter), image upscaling=Softcubic(0.70)+AR, image downscaling=Catmull-Rom+AR (DXVA is also a solution for chroma/image upscaling, if using an Intel HDx000)
- Chroma upscaling=Softcubic(0.70)+AR, image upscaling=Lanczos4+AR, image downscaling=Catmull-Rom+AR
- Chroma upscaling=Lanczos4+AR, image upscaling=Jinc3+AR, image downscaling=Lanczos4+AR
You can enable "use NNEDI3 to double Luma resolution" with 16-64 neurons (over is overkill and will butcher your GPU) and 1.5 or 2.0 factor, only if you're in the Tier 3 (preferably AMD).
- Go under the rendering tab, then general settings. Disable everything but "delay playback start unti render queue is full" (you should tick "enable automatic fullscreen exclusive mode" if you're under Win Vista or older). Then go to smooth motion and verify that it's enabled with "only if there would be motion judder without it..." ticked.
- The trade quality for performance section is a bunch of options that can be enabled or not, according to the user's wishes. Untick everything but "store custom pixel shader results in a 16bit buffer instead of 32bit" and "Don't rerender frames when fade in/out is detected". Now comes the dithering part, choose between Error Diffusion 1 and 2 according to your preferences or between Ordered and Random dithering if the Error Diffusion dithering is too demanding for your GPU (it's really heavy, and the enhancements are almost placebo tier, except for animuh). Then tick "Use colored noise" since the Luma noise is much more visible than Chroma noise and "Change dither for every frame" if you're using Ordered dithering.
You can analyze the rendering performance by pressing "ctrl+j" while playing a video. Ideally, the rendering time must be under (1/FRAME_RATE*1000) milliseconds, i.e. 41,7 for 23,976fps content, the decoder/subtitle/upload/render queue should be almost full and the dropped frames or presentation glitches shouldn't increase during the playback (there's always some at the beginning).
ReClock configuration

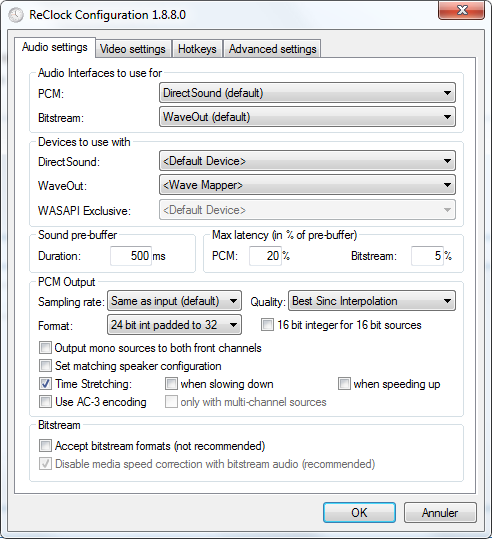
Search "Configure ReClock" in the start menu to edit the general settings.
Choose "best sync interpolation" for quality, "24bit int padded to 32" for format and untick "Output mono sources to both front channels".
Bonus Tips for MPC-HC configuration
Press O for options, then:
- Disable "Show OSD", under the Player section.
- Make all the file extension associations under "Formats" (click on Video to play all your video files with MPC-HC).
- Go to internal filters to configure the splitter (preferred language for audio track/subtitle), the video decoder (to enable hardware acceleration) and the audio decoder (for surround mixing).
- Go to the effects section to use pixel shaders to improve your viewing experience. The most useful ones are the 16-235 -> 0-235 (to have real blacks in greyish videos) and Sharpen complex 2. For better and smoother sharpening, use Luma Sharpen (download and place in the MPC-HC/Shaders folder).